Work with the Scheduling grid 
The Scheduling grid's functionality, labels, and icons let you easily understand the resources' schedules and get the needed information. For details, see the following image and the corresponding descriptions below.
- Resources are the IRP Employees and VMS Candidates (applied to re-orders) within your Organization. Candidates are available on Scheduling only if your Organization is configured to use both IRP and VMS systems and if the Candidates' visibility is turned on for the grid. For details, see Schedule VMS Candidates.
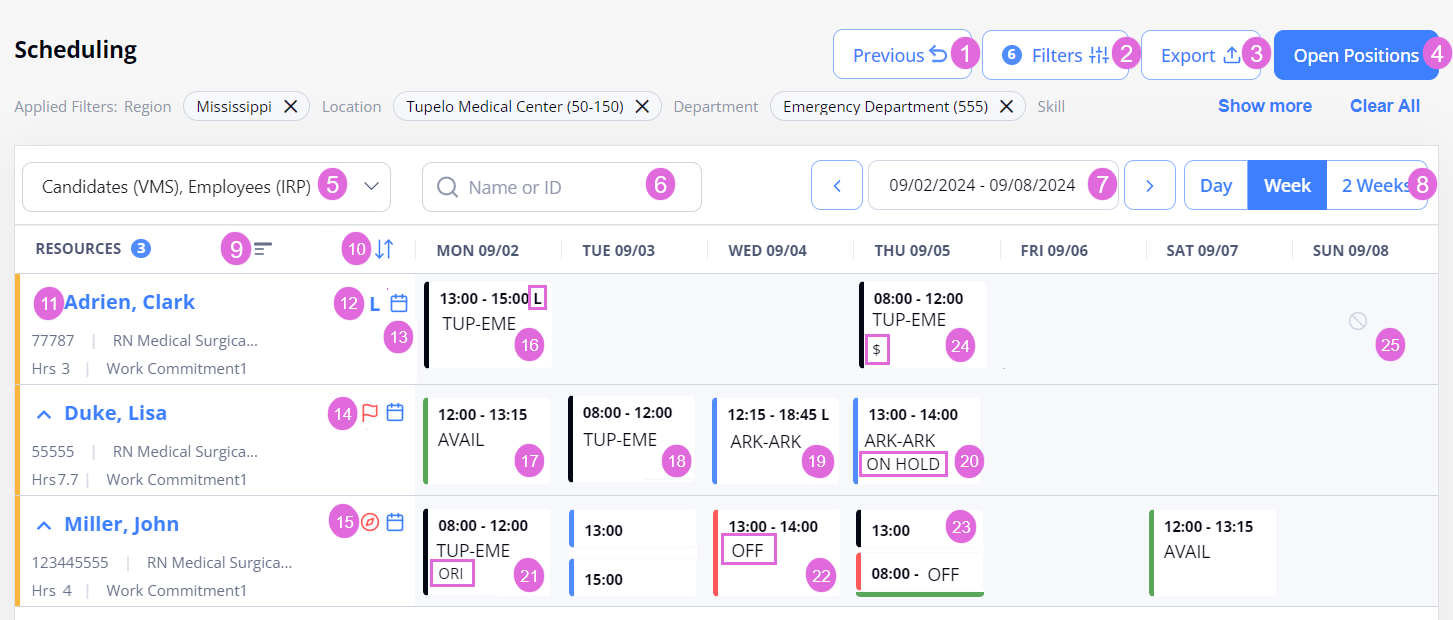
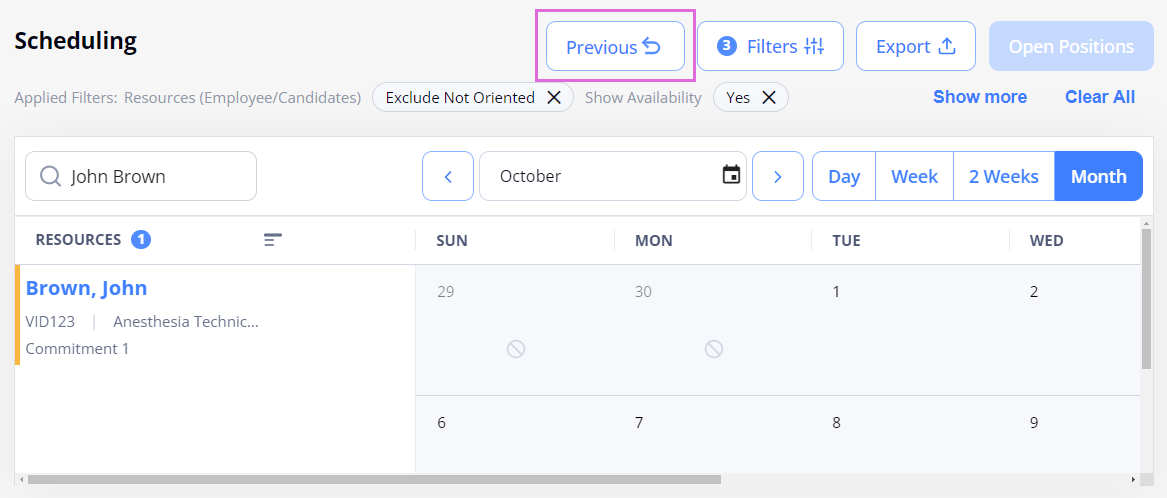
- Get back to the previous grid view.
- Filter the resources in the grid. For details, see Filter the Scheduling grid.
- Export the current state of the grid. For details, see Export the Scheduling grid.
- Schedule matching open Per Diem positions. For details, see Schedule open positions.
- Select the type of resources you want to view in the grid: Employees (IRP) or Candidates (VMS).
- This menu is available only if your Organization is configured to use both IRP and VMS systems, and if the Candidates' visibility is turned ON for your Organization.
- Search for a specific resource by their first and last name or ID. This will display the monthly schedule for the resource you searched for. For details, see Open the needed schedule.
- Specify the date range to view in the grid.
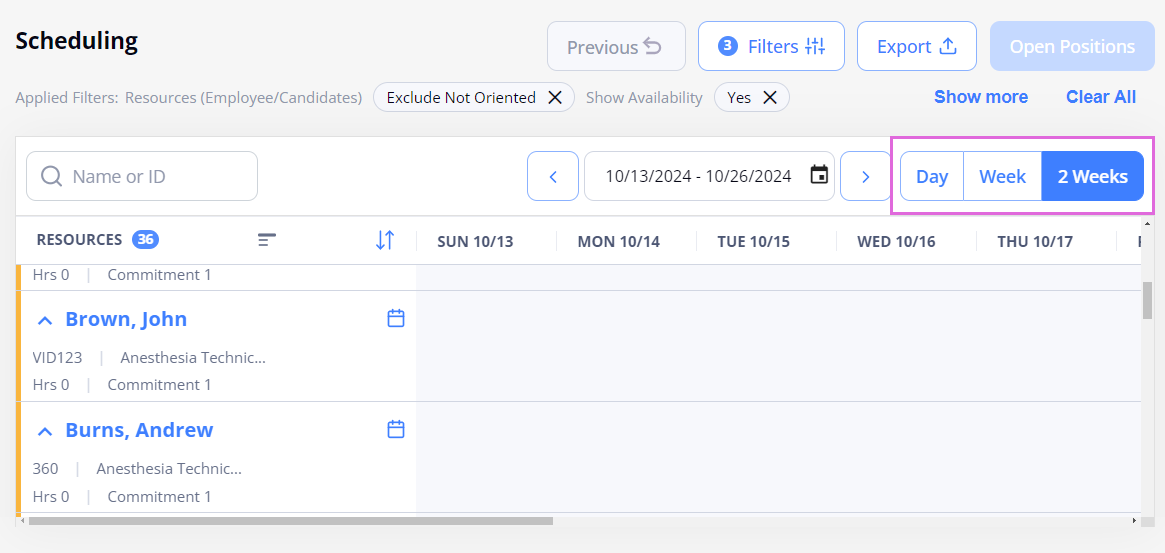
- Select the calendar view.
 Collapse/expand the grid. The expanded view is the default one (see the image above), while the collapsed view displays one row for each Employee (Hide the imageSee the image).
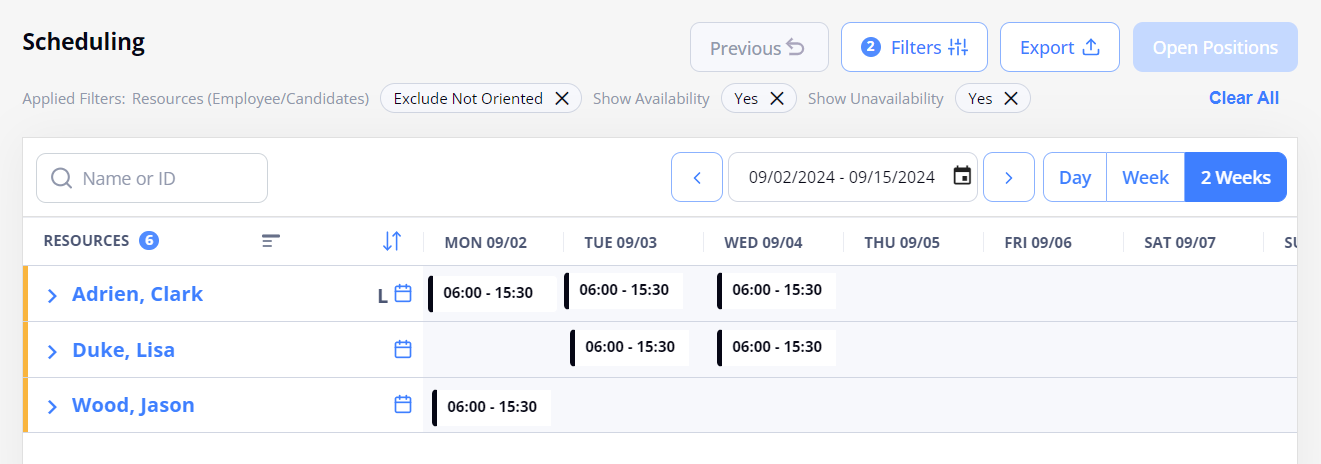
 Change sorting of resources in the grid. For details, see Change sorting in the Scheduling grid.
- Select the needed name to open the Employee's/Candidate's card with the detailed information and ability to navigate to their profile and credentials (Hide the imageSee the image).
- Employee cards are those with the orange bar on the right.
Candidate cards are those with the purple bar on the right
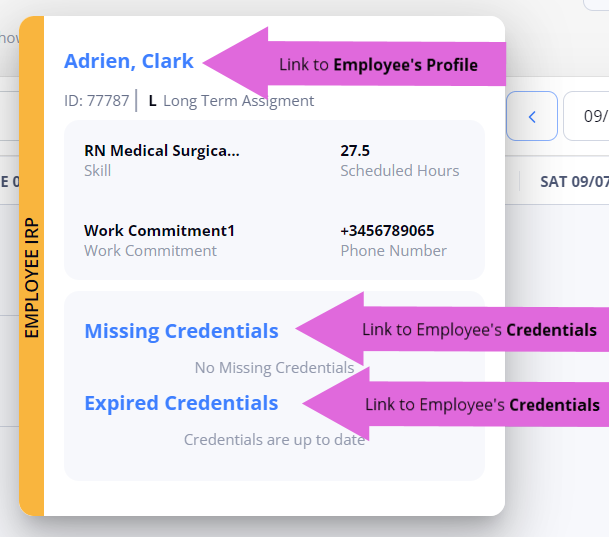
- Employee cards are those with the orange bar on the right.
 The Employee is onboarded on an LTA order for the period filtered in the grid. Hover over this icon to view the order's details and its Start and End Dates. Also, see number 16.
 Open the Employee's Monthly schedule across all the eligible locations and departments of the Employee.
 General note marked with a red flag added on the Employee's profile. To view the note, hover over the red flag icon. Also, you can view this and other notes related to the Employee on their profile. For details, see Employees.
 The Employee is not oriented in the selected department. For details, go to Orientation. Also, see number 21.
 LTA booking (with the L icon next to the booked time range.) Here, you can also view the shortened names of the location and department of the scheduled booking. Hover over them to view their full names and the corresponding LTA order ID.
 Availability.
- Per Diem booking. Here, you can also view the shortened names of the location and department of the scheduled booking. Hover over them to view their full names, the booking ID, or the corresponding Per Diem order ID (if the scheduled booking is linked to an order).
 Floated booking. The blue line is displayed for a booking if:
- An Employee is scheduled in a different region-location-department than selected in filters (not applicable for multiple filter selections.)
OR - If an Employee is scheduled in a different region-location-department than assigned as Home Cost Center (applicable only for a single Employee view with no filters applied.)
- An Employee is scheduled in a different region-location-department than selected in filters (not applicable for multiple filter selections.)
- Booking that falls within the Employee's on-hold period and not removed when status was set to On Hold. For details, see On Hold status.
- Orientation booking (with the ORI icon below the location-department names.)
 Unavailability. Here, you can also view the selected unavailability reason.
- Multiple events for a day. If more than two events are scheduled for a day, then a line of the corresponding color is visible at the bottom of the date cell. Hover over the date cell or select it to view details of all the scheduled events.
- Bonus ($) shift. A booking with the Bonus toggle turned ON.
 Date out of the Employee's active department assignment or within their On Hold/Inactive period. Hover over the cell to view the details.
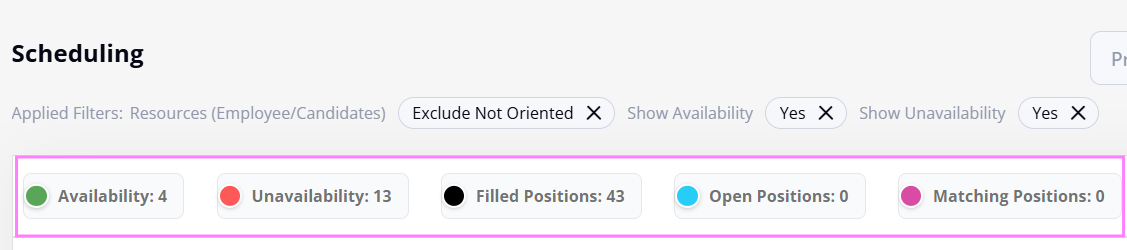
- Here, you can view the total counts of Availability, Unavailability, Filled Positions, Open Positions, and Matching Positions (between Availability and Open Positions), based on the selected filters and date range.
Open the needed schedule
By default, on Scheduling, you see the schedules for all the resources within your Organization. To schedule bookings and other events, you can open the needed schedules in one of the following ways:
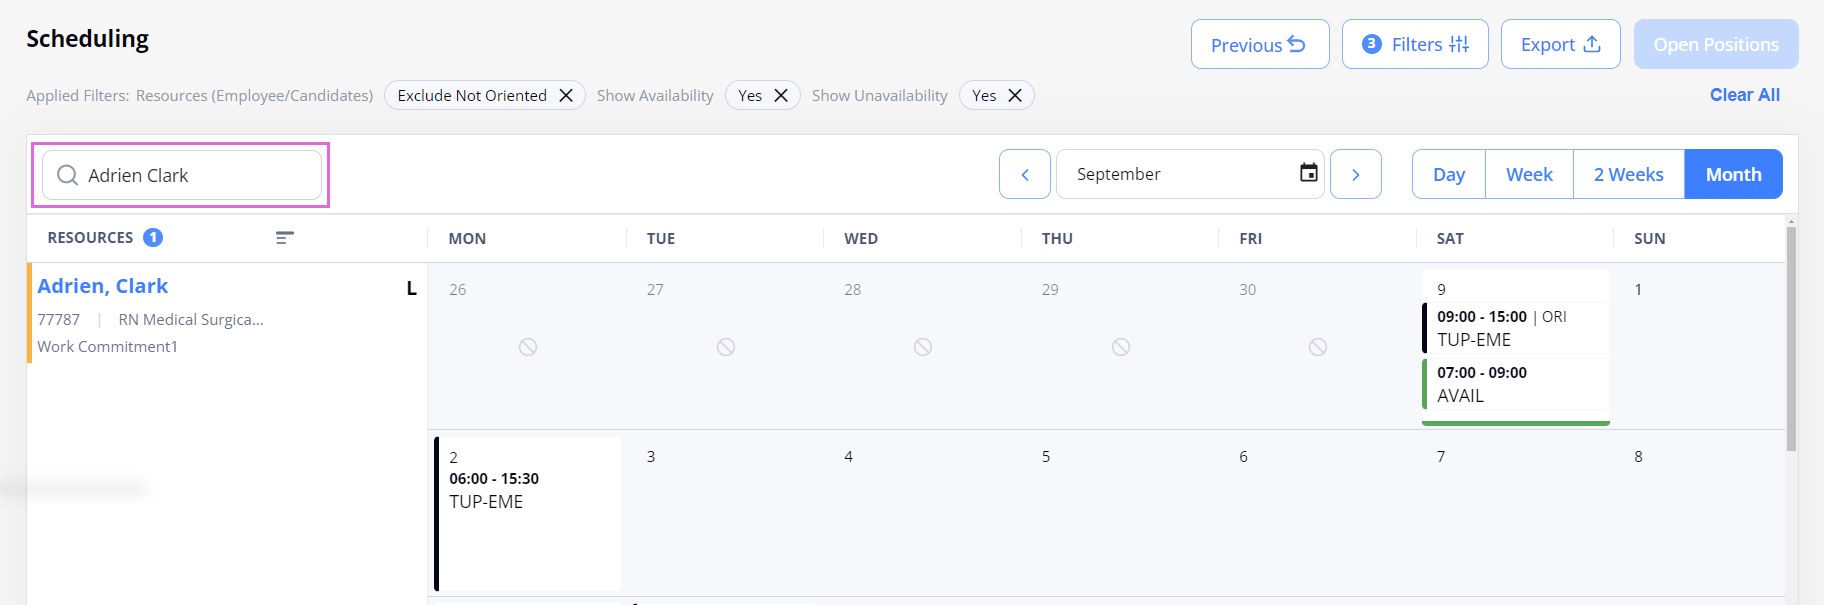
- To view the schedule for a specific resource, search by the resource's First/ Last Name or ID and specify the required date range. This opens the person's schedules for the selected month across all their eligible departments Hide the imageSee the image. But in this view, the grid is automatically filtered to the Employee's Home Cost Center (for details, go to Assign Home Cost Center) or their first active department (if no HCC is assigned).
- Monthly view is available only for a single-resource selection.
You can also open the resource's Monthly schedule by selecting the calendar icon
next to the needed name in the grid. Hide the imageSee the image.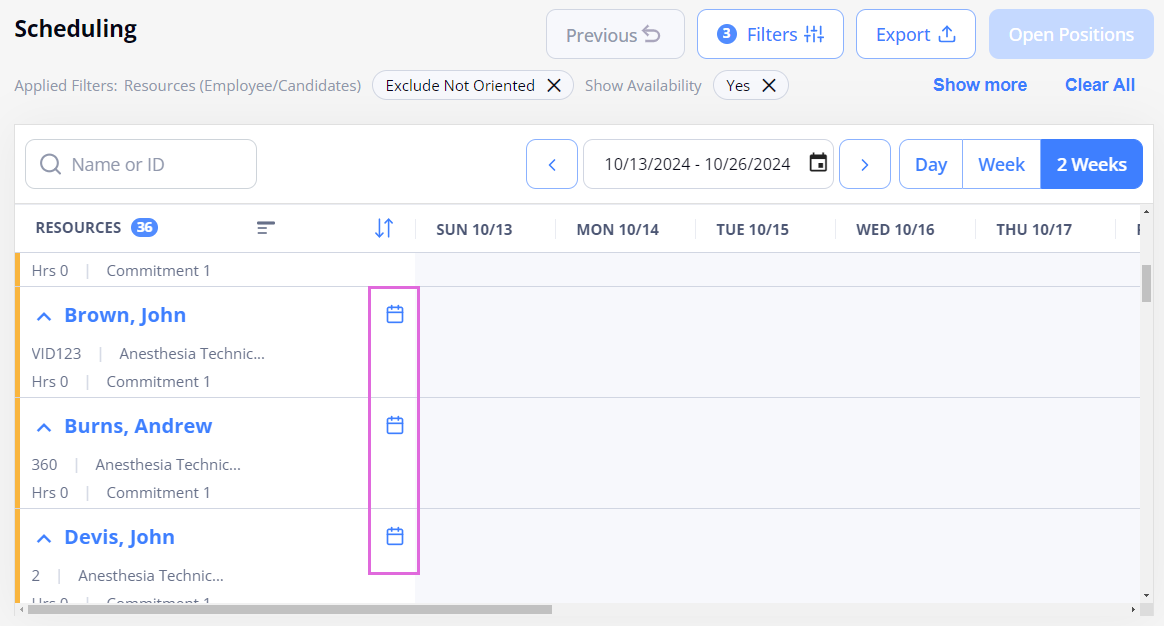
- To get back to the previous view of the grid, use the Previous button at the top of the Scheduling page. Hide the imageSee the image.
- To view the schedule for a specific department or multiple departments, use Filters to select the needed region(s), location(s), department(s), and, optionally, skill(s). Hide the imageSee the image.
For more details, see Filter the Scheduling grid.- The grid displays only the resources whose department assignments are active during the specified period. You cannot schedule dates outside of the active department assignments.
Both for a single resource's schedule and a department's schedule, you can switch between different calendar views: Day, Week, or 2 Weeks. Hide the imageSee the image.
Filter the Scheduling grid
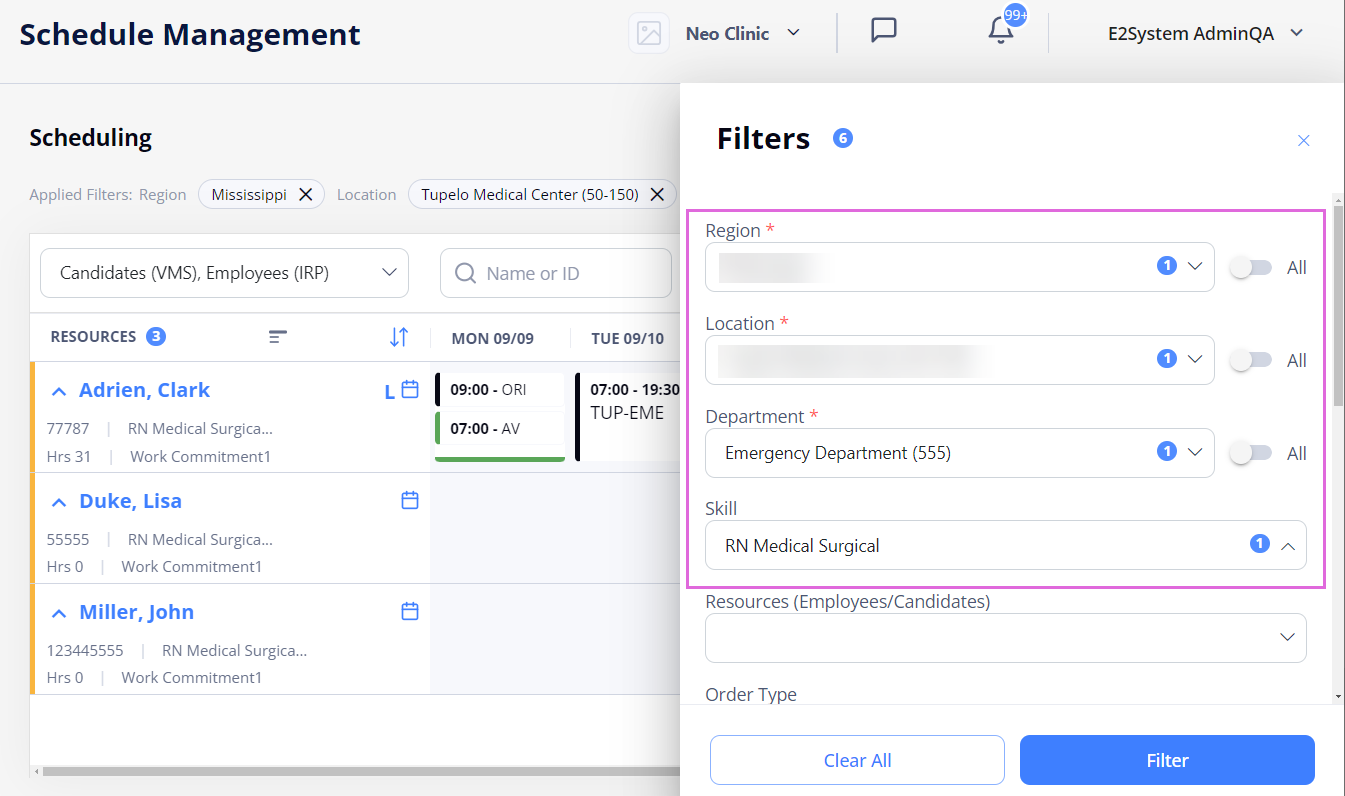
On Scheduling, you can define the following filtering criteria to narrow down the list of resources you want to view and schedule (ide the imageSee the image):
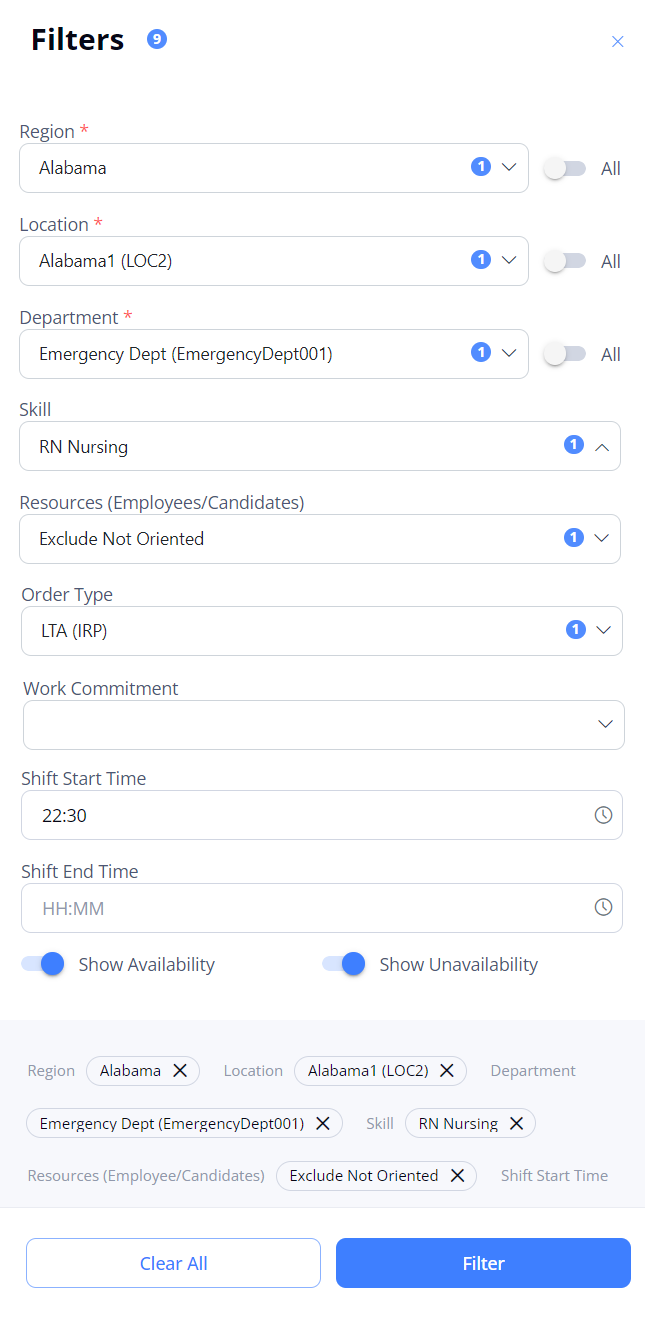
- Region*: select the region(s) to view the resources.
- Location*: select the location(s) within the previously selected region(s) to view the resources.
- Department*: select the department(s) within the previously selected location(s) to view the resources.
- Skill: select the skill(s) within the previously selected department(s) to view the resources.
- To schedule bookings, you must filter resources by a single region-location-department-skill.
To schedule matching open Per Diem positions and availability/unavailability, you may filter resources by single or multiple region(s)-location(s)-department(s)-skill(s), depending on your Organization's configuration.
- To schedule bookings, you must filter resources by a single region-location-department-skill.
- Resources (Employees/Candidates): select the following criteria to view the respective resources in the grid:
- Exclude Not Oriented: view only the Employees oriented in the selected department(s).
- Resource only with Availability: view resources with at least one scheduled availability slot.
- Scheduled Employees: view Employees with at least one scheduled booking, regardless of the selected department(s).
- Scheduled in Selected Departments: view Employees with at least one booking scheduled in the selected department(s).
- Order Type: select the following order type(s) to view the respective resources in the grid:
- This filter is NOT available for the Month view of the grid.
- LTA (IRP): view only the Employees that are Onboard/Offboard/Cancelled on LTA orders for at least one day within the visible period.
- LTA Rapid Response (IRP): view only the Employees that are Onboard/Offboard/Cancelled on LTA - Rapid Response orders for at least one day within the visible period.
- Per Diem (IRP): view only the Employees that have at least one day when they are NOT Onboard on any LTA/LTA - Rapid Response order within the visible period. This means that you can schedule Per Diem bookings for these Employees within this period.
- Re-order (VMS): view only the Candidates that are Applied/Onboard on Re-orders distributed from IRP to VMS within the visible period.
- The Re-order (VMS) option is available in the Order Type filter only if your Organization is configured to use both IRP and VMS systems and if Candidates' visibility is turned on for the Scheduling grid.
- Work Commitment: select the work commitment(s) based on the previously selected region(s) and location(s) to view the resources.
- This filter displays only work commitments that are active for at least one day within the visible period.
- Shift Start Time: specify the shift start time to view the resources scheduled for such shifts.
- Shift End Time: specify the shift end time to view the resources scheduled for such shifts.
In addition, you can turn ON/OFF the Show Availability and Show Unavailability toggles to view or hide the corresponding slots.
The applied filters will be preserved on the Scheduling page until you change them next time.
- In any filtered view, the bookings scheduled in the department(s) different from those selected in Filters are displayed as floated ones.
Change sorting in the Scheduling grid
By default, the resources in the Scheduling grid are sorted as follows:
- First, the IRP Employees are displayed, sorted by their first name (A > Z) and last name (A > Z).
- Afterward, the VMS Candidates are displayed, sorted by their first name (A > Z) and last name (A > Z) (if they are visible in the Scheduling grid).
You can change the default sorting in the Scheduling grid to view the list of resources in the needed order.
To change sorting in the Scheduling grid:
- On Scheduling, select the sorting icon in the Resources column header (see #10 in the overview image above).
- In the Sorting in Priority sidebar:
- (Optional) To group Employees based on their assigned work commitments, turn on the Grouping by Work Commitment toggle. Then set the priority to display the groups by dragging the work commitments accordingly. Hide the imageSee the image.
- The list of work commitments available for grouping depends on the Work Commitment filter applied to the Scheduling grid.

- To set the priority to display the resources, drag
 the needed categories as required. Also, for each category, you can change the order by using the corresponding arrows
  . You can also add and remove the categories. Hide the imageSee the image. For details, see Sorting categories.
- Categories available for sorting depend on the selected resource type (IRP Employees/VMS Candidates).
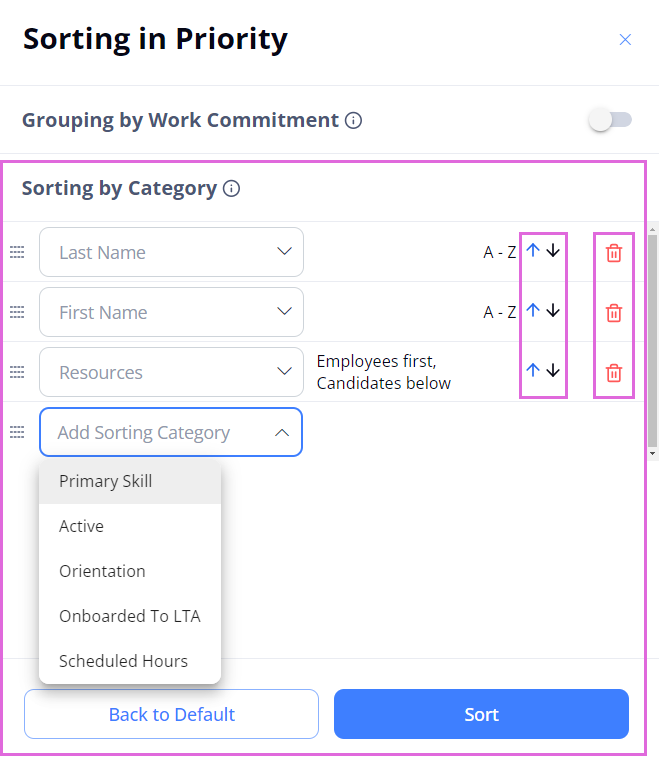
- Select Sort to apply the defined grouping/sorting.
- (Optional) To group Employees based on their assigned work commitments, turn on the Grouping by Work Commitment toggle. Then set the priority to display the groups by dragging the work commitments accordingly. Hide the imageSee the image.
If Employees are grouped by work commitments, the defined sorting is applied within each group. VMS Candidates are then listed below all the groups (if they are visible in the Scheduling grid).
If no grouping is created, the defined sorting is applied to Employees and Candidates together (if the latter ones are visible in the Scheduling grid and if the sorting categories are applicable to both resource types).
If the applied sorting is not applicable to Candidates, they are sorted by their first and last name.
Sorting categories
Following are the categories you can use to sort the resources in the Scheduling grid.
| Sorting Category | Logic, options | Applicable to |
|
First Name |
|
IRP Employees VMS Candidates |
|
Last Name |
|
IRP Employees VMS Candidates |
|
Resources |
|
IRP Employees VMS Candidates |
|
Primary Skill |
|
IRP Employees VMS Candidates |
|
Scheduled Hours |
|
IRP Employees |
|
Active |
For details, see Employee's profile statuses. |
IRP Employees |
|
Orientation |
For details, see Orientation. |
IRP Employees |
|
Onboarded to LTA |
|
IRP Employees |
Export the Scheduling grid
You can export the current state of the Scheduling grid into a single PDF or Excel file by selecting Export above the grid and choosing the desired option. Hide the imageSee the image. The exported grid will preserve all the applied filters.
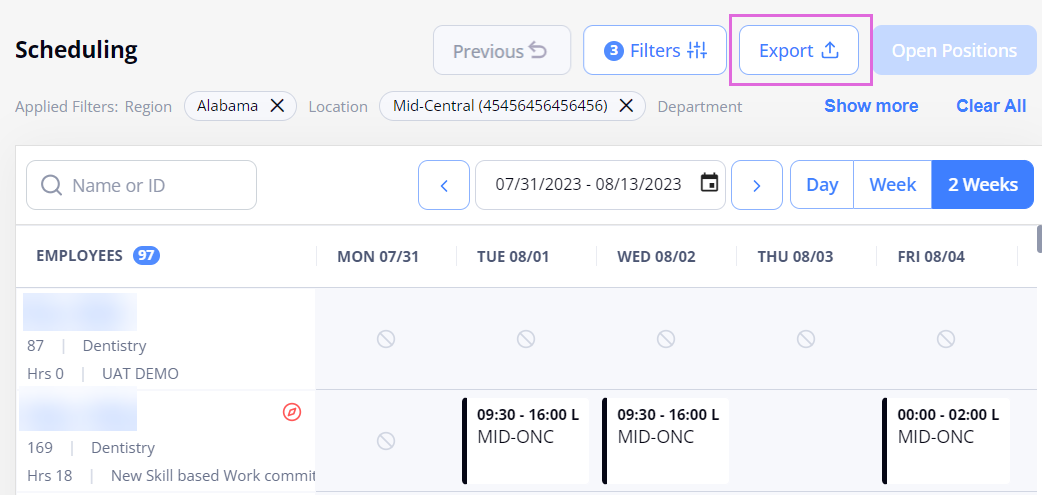
- You may export schedules only if you have the proper permission.
Watch videos
The following set of videos describes the basics of working with the Scheduling grid.
| Functionality | Video |
|
1. Intro and the default view of the grid. |
|
|
2. Select the resources' type. |
|
|
3. Use Search. |
|
|
4. Use Filters. |
|
|
5. Change Sorting. |
|
|
6. Understand the labels. |
See also
- Schedule bookings
- Schedule open positions
- Schedule availability/unavailability
- Schedule more events for the day
- Edit scheduled events
- Remove scheduled events
- Schedule VMS Candidates